How to Build Your Own Academic Homepage by Hugo
About this tutorial
This post summarizes my approach after iterating my own academic homepage several times. It’s targeted at folks who want to build their own academic homepage and avoid looking too similar to everyone else. Some people just write pure HTML+CSS by hand (academic homepages are usually static and not that hard), and some use templates their school provides.
An academic homepage is just one way for others to learn about you — what you actually have to show matters more. This blog is just a quick on-ramp for people who aren’t already familiar with the tooling, so you can spend more time on actual research and projects.
What you’ll see:
- A basic introduction to Hugo, plus installation
- Installing Git and using GitHub Pages (optional)
- Picking and using an open-source Hugo theme
- Setting up GitHub Actions to auto-build the source
- Configuring a custom domain (optional)
0 Why Hugo? What is Hugo?
There are many ways to build a personal academic homepage. The most common option is Jekyll Academic Pages, and there are also engines like WordPress, Hexo, and VuePress.
Hugo is a static site generator written in Go. It’s known for being lightweight and fast, has a decent number of beautiful open-source themes, and — most importantly — pages built with Hugo themes are less likely to look identical to everyone else’s.
1 Installing Hugo
Before installing Hugo, make sure you have Golang (Go language support) and Node.js (JavaScript support — not strictly required, but some themes need it) set up.
[Golang download] [Node.js download]
1.1 Installing on macOS
I’d recommend Homebrew. You can grab it from the official site, or run the install command below. If the download is slow, there are domestic mirrors you can use.
Homebrew [English site] [Chinese site]
Install Homebrew with:
/bin/bash -c "$(curl -fsSL https://raw.githubusercontent.com/Homebrew/install/HEAD/install.sh)"
Once Homebrew is installed, install Hugo:
brew install hugo
hugo version
If hugo version prints a version number, the install succeeded.
1.2 Installing on Windows
For Windows, I’d just download the .exe from the official site. After installing and restarting, run hugo version to check. I haven’t tried this myself, so for any issues, search around for other blogs.
2 Setting up the GitHub repos and GitHub Pages
Whether it’s an academic or personal blog homepage, the content is mostly static — no backend needed. I recommend using GitHub Pages for deployment, because:
- It’s free, no separate server required, lower cost.
- No risk of being attacked.
- Easier to link with your project code (if you have open-source papers).
You could also use Vercel, which is also fast. Since GitHub Pages fully meets the needs of this project, I won’t go into Vercel here.
2.1 Creating the GitHub repos
To deploy via GitHub Pages, you generally need two repos: one for source code and one for the Hugo-compiled public output (the GitHub Pages repo). The reason is that the Pages repo has to be public, but you don’t necessarily want everyone to see your source code. So:
- Source code repo (private)
- GitHub Pages repo (public)
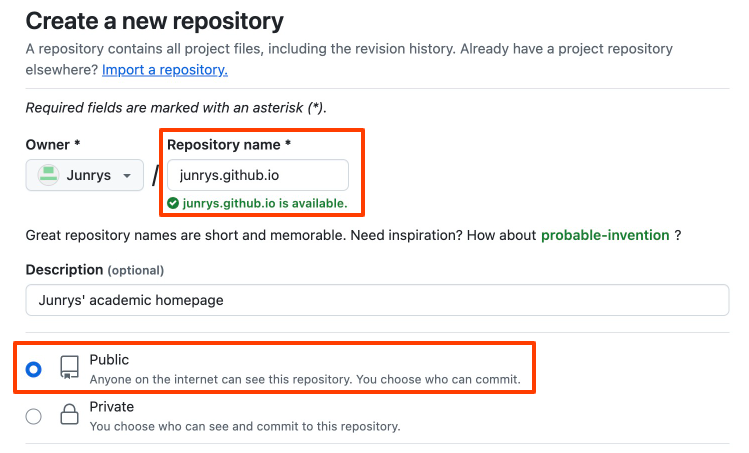
First, create the GitHub Pages repo. This repo must be named username.github.io, where username is your GitHub username. For example, mine is junrys.github.io (case-insensitive).
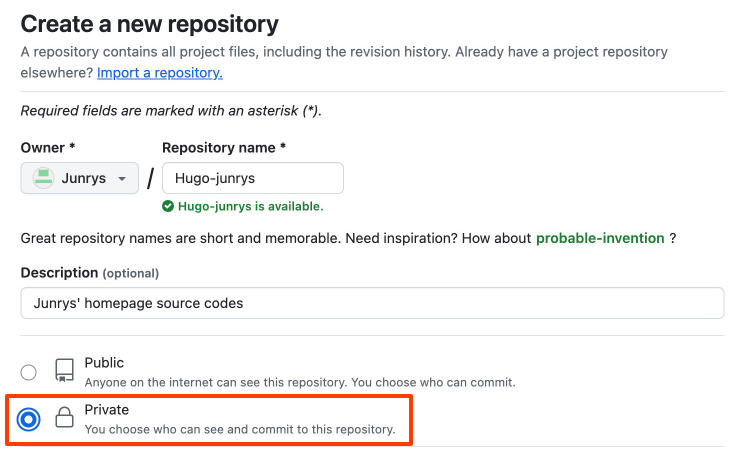
Then, create the repo for source code. The name can be anything; I used Hugo-junrys.
2.2 Cloning the repo locally
Cloning the repo locally makes maintenance easier. Before this, make sure you have Git installed and configured, or use GitHub Desktop (GitHub’s GUI client).
If you’re just here to set up this site and haven’t learned Git, I’d recommend GitHub Desktop — the configuration is simpler, and the GUI is more intuitive.
Once installed, open a terminal, navigate to the folder where you want the project, and clone the source code repo. Note: you don’t need to clone the GitHub Pages repo here — once GitHub Actions is set up, the code will sync over automatically.
git clone git@github.com:junrys/hugo-junrys.git
cd hugo-junrys
Since we haven’t written any code yet, the cloned hugo-junrys folder should be empty (apart from the hidden .git). Note: throughout the rest of this post, “root directory” refers to the hugo-junrys folder.
2.3 Creating the basic Hugo site
Next, create the Hugo site:
hugo new site . --force

The folder should now contain Hugo site files. The important ones:
content: usually used to store the markdown files for your pagesstatic: static resources (images, etc.)themes: where the theme livespublic: the compiled site output
Now run the following command, and you can access the site at localhost:1313. (Check the port shown after running the command — it’s not always 1313.)
hugo server
The basic site config is done. Next, install a theme.
2 Picking and customizing a Hugo theme
Many developers contribute open-source themes for Hugo. You can browse them at the [Hugo theme list].
For an academic homepage, pick something clean and tidy that clearly displays your bio, research interests, results, awards, and so on.
I’ll use Beautiful Hugo as an example. You can pick whatever theme fits you best. Although most open-source themes are MIT-licensed, double-check the license up front to avoid issues. If you can afford it, consider buying the theme author a coffee~
The Beautiful Hugo theme’s site lists two install methods; I use the second. Other themes are similar — the author usually documents the install method on the home page.
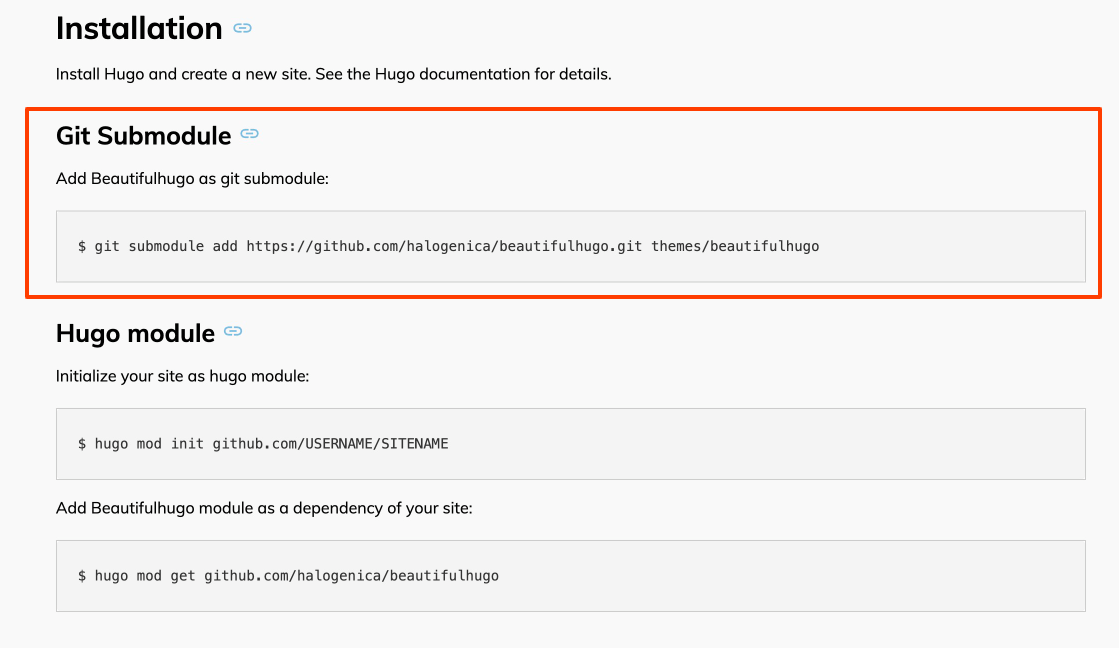
Run the following inside your Hugo-junrys directory:
git submodule add https://github.com/halogenica/beautifulhugo.git themes/beautifulhugo
After a moment, the themes folder will contain a beautifulhugo directory — that’s the theme.
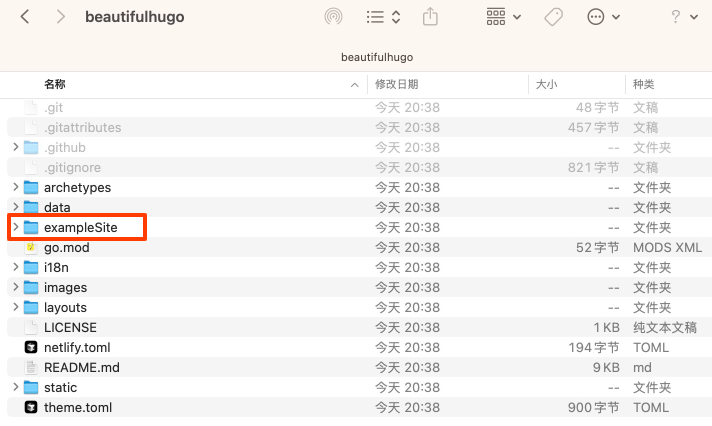
Theme authors usually provide an exampleSite you can use as a starting point — you really just need to swap out some text. There are two ways:
- Delete the files generated by
hugo new site(exceptthemes), then copy everything fromexampleSiteinto your root. - Copy the
exampleSitefolders into the matching root folders (e.g.content→content,static→static), and copy the theme’sconfig.yamlto the root directly.
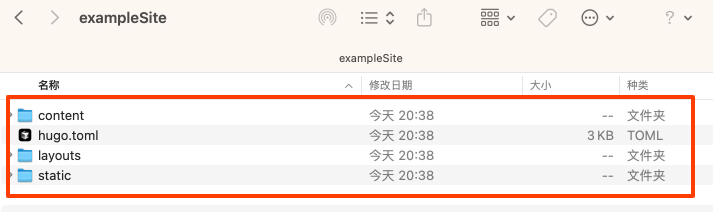
Example site folder structure
Then run hugo server again from the root, and you’ll see the templated site:
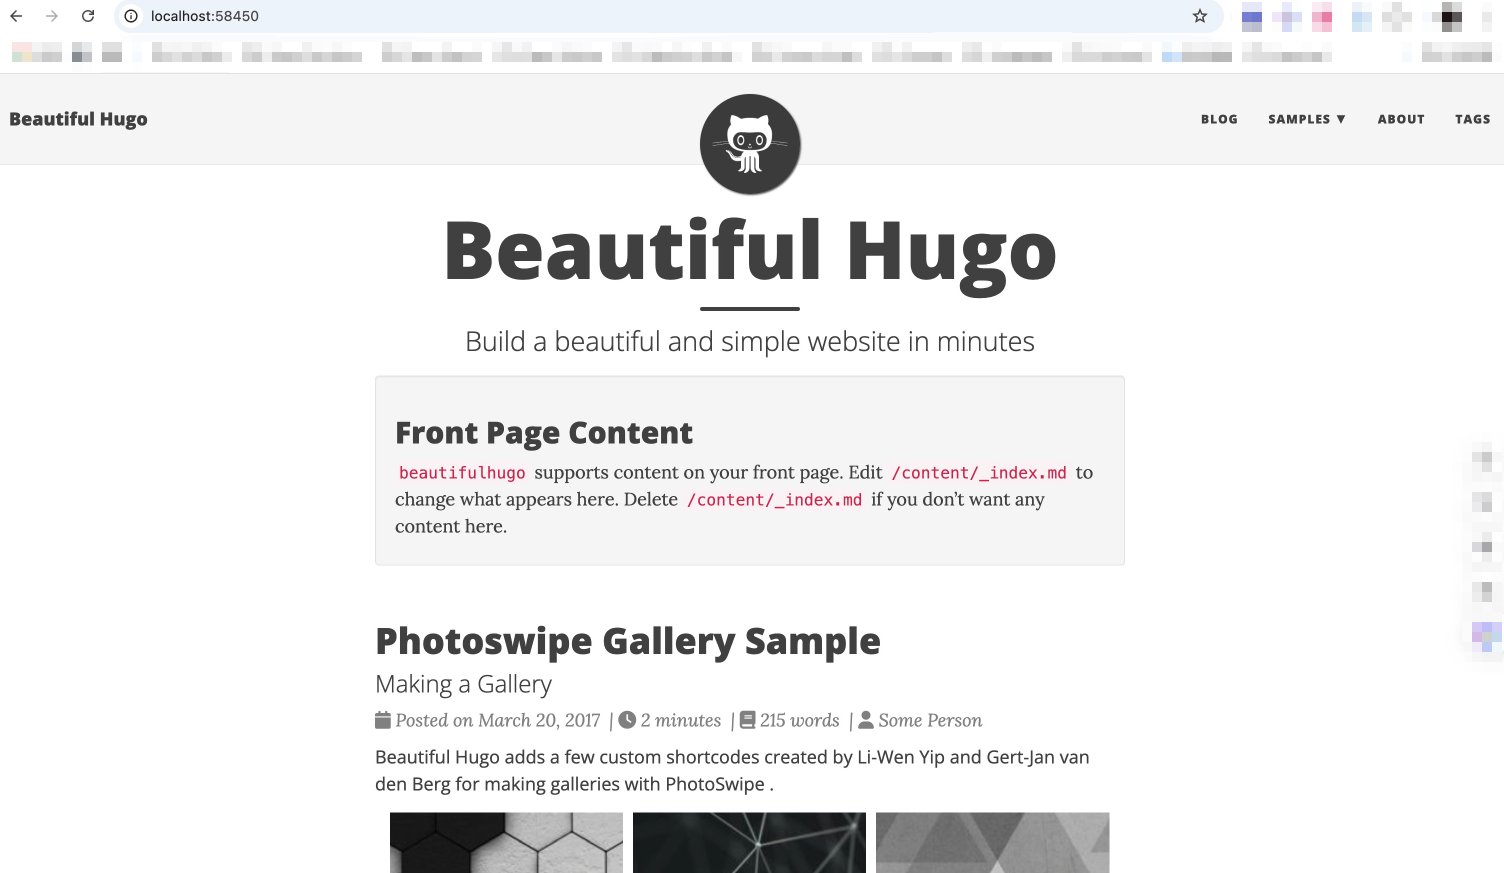
Example site rendered
Copying the author’s exampleSite avoids most issues and gets you a working template site. That said, some older themes (like mini) might not be compatible with current Hugo versions, in which case you’ll have to debug a bit yourself.
The basic site is now done. Build it from the root with:
hugo
After it builds, the public folder will contain the site code.
That mostly wraps up the local setup. Next, we need to push to GitHub and set up GitHub Actions for auto-deployment.
If you’re using GitHub Desktop, this is straightforward — push the source code via the GUI to your Hugo-junrys repo on GitHub.
Then we configure the GitHub Action.
Before configuring it, you’ll need a Personal Access Token from GitHub.
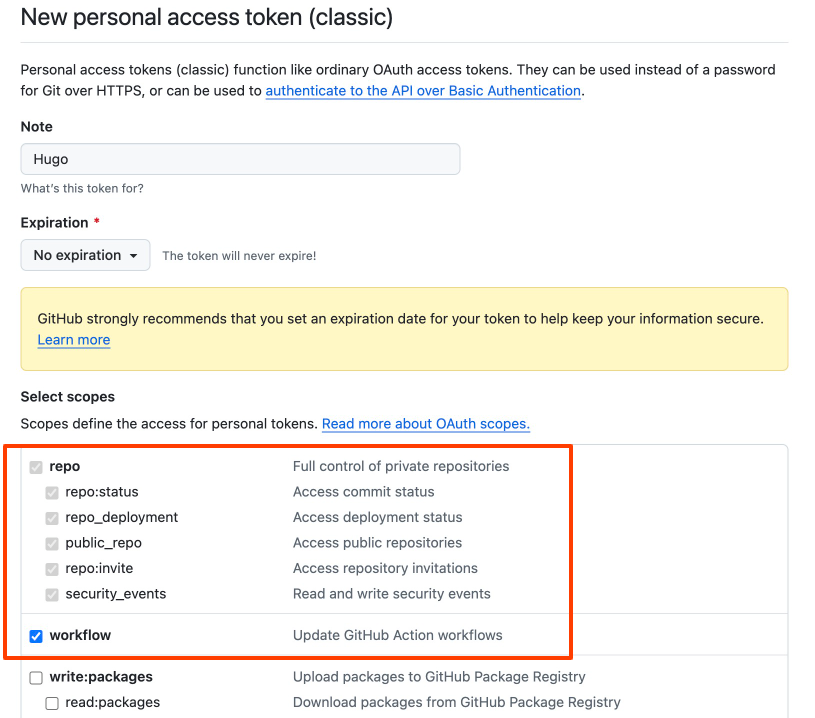
Click your avatar in the top-right corner and go to Settings → Developer Settings → Personal access tokens → Tokens (classic) → Generate new token (classic).
Token generation page
You can name the token whatever you like, just remember it for later. Expiration is up to you — I’d recommend “no expiration” for personal use. Be sure to check repo and workflow; you can leave the rest unchecked. Hit Generate token.
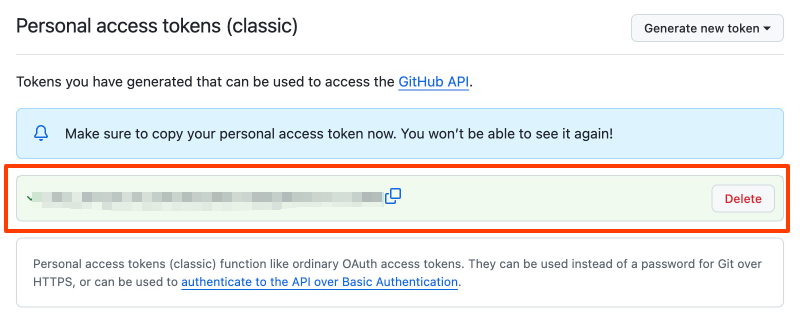
You’ll then see a page with the token. Save it now — you can’t view it again afterwards. We’ll need it when configuring the GitHub Action.
Generated token (save it!)
Now click into the Actions tab of your source repo so we can wire up the workflow.
Specifically, in the source repo’s root, create a .github/workflows/ folder, and in it create a main.yml file with the following (this is the config I’m currently using):
name: GitHub Pages

on:
  push:
    branches:
      - main
  pull_request:

jobs:
  deploy:
    runs-on: ubuntu-latest
    concurrency:
      group: ${{ github.workflow }}-${{ github.ref }}
    steps:
      - uses: actions/checkout@v2
        with:
          submodules: true
          fetch-depth: 0

      - name: Setup Hugo
        uses: peaceiris/actions-hugo@v2
        with:
          hugo-version: '0.140.2'
          extended: true

      - name: Build
        run: hugo --minify

      - name: Deploy
        uses: peaceiris/actions-gh-pages@v3
        if: ${{ github.ref == 'refs/heads/main' }}
        with:
          personal_token: ${{ secrets.hugo }}
          external_repository: yourname/yourname.github.io
          publish_dir: ./public
A few things you need to adjust:
hugo-version: use a stable, reasonably new version like0.140.2. Versions that are too old may not be compatible with newer themes.external_repository: change to your own GitHub Pages repo, e.g.yourname/yourname.github.io.secrets.hugo:hugohere is the secret’s name. You’ll set this up in the repo settings below — the names just have to match.
Next, add the Personal Access Token from earlier to the repo’s Secrets. Open source repo → Settings → Secrets and variables → Actions → New repository secret:
- Name:
hugo(matchessecrets.hugoin the yml) - Secret: paste the token you saved earlier
Once that’s set up, commit and push everything to the main branch. The GitHub Action will trigger automatically, and you can watch the run in the source repo’s Actions tab. If everything works, within a few minutes you’ll see a green checkmark — your code has been compiled and pushed to your GitHub Pages repo.
Open your browser and go to https://yourname.github.io, and you should see your academic homepage.
After this, every time you push changes to main, the Action will rebuild and redeploy automatically. That’s what “automation” means here~
3 Custom domain (optional)
Using the default yourname.github.io is totally fine. But if you’ve already bought (or plan to buy) your own domain, binding it to GitHub Pages looks a bit more professional, and makes it easier to switch deployment platforms later.
You can buy domains from Cloudflare, Namecheap, Aliyun, etc. I’m currently using Cloudflare — pricing is reasonable and DNS resolution is fast.
The binding has two sides:
3.1 Add a CNAME file in the source repo
In your source repo’s static/ folder, create a file named CNAME (no extension), with one line — your domain:
www.xuejunyu.com
When Hugo builds, it copies everything in static/ verbatim to the public/ root, which is then pushed to your GitHub Pages repo via the Action. GitHub Pages picks up the CNAME file at the root and binds the domain automatically.
Alternatively, you can fill in the Custom domain field directly under GitHub Pages repo → Settings → Pages. Same effect.
3.2 Configure DNS at the domain registrar
Next, add DNS records in your registrar’s DNS console. If you’re using a subdomain like www.xxx.com, just add one CNAME record:
- Type:
CNAME - Host:
www - Value:
yourname.github.io
If you want to use the apex domain (no www, just xxx.com), add four A records pointing at GitHub Pages’ IPs:
185.199.108.153
185.199.109.153
185.199.110.153
185.199.111.153
DNS usually takes a few minutes to an hour to propagate. After that, your custom domain should serve your homepage.
Note that GitHub Pages will automatically request a Let’s Encrypt certificate for HTTPS, but there’s sometimes a few minutes’ delay after setup. If your browser shows a “certificate error”, just wait a bit and retry.
4 Some experience and tips
To wrap up, a few personal thoughts on maintaining an academic homepage:
- Content matters more than style. An academic homepage is mainly for fellow researchers and faculty to look at. Clearly displaying your research direction, results, and contact info is the core. Spending too much time tweaking colors and animations is missing the point.
- Keep it updated. Each time you have a new paper, award, or experience, update the page promptly. Don’t let your homepage stay stuck two years in the past.
- Compress images. Don’t upload a multi-MB raw image as your avatar. Run it through a tool like TinyPNG — mobile users will thank you.
- Back up your source code regularly. Don’t keep code only on your local machine; push to GitHub regularly. It guards against data loss, and the Action needs it anyway.
Hope this tutorial is helpful.